@sandor_nemeth
Creating a Swarm cluster
Published on 19 Nov 2017
Today I am starting a series of articles on how to build an on-premise cluster. Admittedly, this is a demo-setup, which means that one should be precisely aware what needs to happen to make this a setup ready for production.
OK, with the disclaimer noted, let’s get going on setting up a Docker Swarm cluster.
First let’s create 3 VMs which will be the base of our cluster:
docker-machine create --driver virtualbox swarm-1
docker-machine create --driver virtualbox swarm-2
docker-machine create --driver virtualbox swarm-3
This will produce 3 virtual machines running Docker. The status of the machines can be checked with:
docker-machine ls
NAME      ACTIVE   DRIVER       STATE     URL                         SWARM   DOCKER        ERRORS
swarm-1   -        virtualbox   Running   tcp://192.168.99.100:2376           v17.10.0-ce
swarm-2   -        virtualbox   Running   tcp://192.168.99.101:2376           v17.10.0-ce
swarm-3   -        virtualbox   Running   tcp://192.168.99.102:2376           v17.10.0-ce
If you see this, then we are good to go for the next step! Let’s first log into the swarm-1 node:
docker-machine ssh swarm-1
and then initialize the Swarm:
docker@swarm-1:~$ docker swarm init --advertise-addr 192.168.99.100
The output will be something like :
Swarm initialized: current node (gf08pznw2zs18tx6orb25tz4k) is now a manager.

To add a worker to this swarm, run the following command:

    docker swarm join --token SWMTKN-1-00lmdzil7f5rm0gk1oniggzyq3k6fqo5mwqs5w9z9hevkt1fd7-dlyhbddns5ds731fg5rnohpx1 192.168.99.100:2377

To add a manager to this swarm, run 'docker swarm join-token manager' and follow the instructions.
At this point you should be able to check the cluster state to see the first node initialized:
# point docker to the initialized vm
eval $(docker-machine env swarm-1)

# and then see the swarm nodes
docker node ls
ID                            HOSTNAME            STATUS              AVAILABILITY        MANAGER STATUS
gf08pznw2zs18tx6orb25tz4k *   swarm-1             Ready               Active              Leader
Now we log in to the two other machines, and make them join to the cluster:
docker-machine ssh swarm-2
docker@swarm-2:~$ docker swarm join --token SWMTKN-1-00lmdzil7f5rm0gk1oniggzyq3k6fqo5mwqs5w9z9hevkt1fd7-dlyhbddns5ds731fg5rnohpx1 192.168.99.100:2377

docker-machine ssh swarm-3
docker@swarm-3:~$ docker swarm join --token SWMTKN-1-00lmdzil7f5rm0gk1oniggzyq3k6fqo5mwqs5w9z9hevkt1fd7-dlyhbddns5ds731fg5rnohpx1 192.168.99.100:2377
And we are ready to go! Let’s just check the swarm cluster status:
docker node ls
ID                            HOSTNAME            STATUS              AVAILABILITY        MANAGER STATUS
gf08pznw2zs18tx6orb25tz4k *   swarm-1             Ready               Active              Leader
l2pqciwayw07asybejsreiw16     swarm-2             Ready               Active
r9fj3ampjky9qgol0ja72097t     swarm-3             Ready               Active
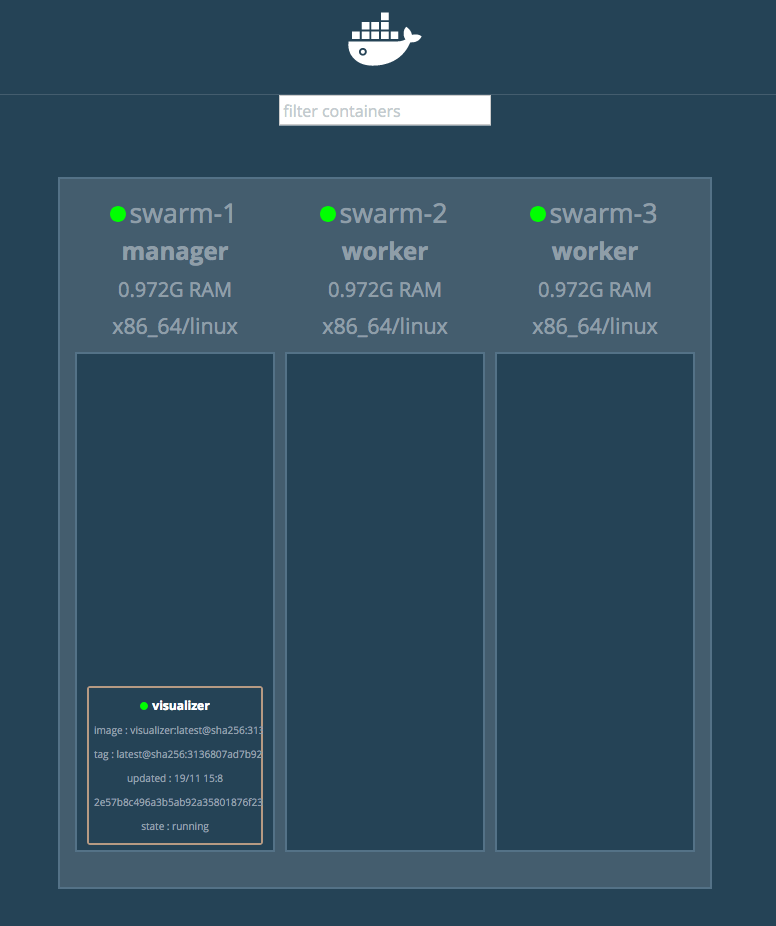
Now the next step is to deploy a small visualization tool for our swarm. This will be the first service which we are deploying.
docker service create \
  --name=visualizer \
  --publish=8083:8080/tcp \
  --constraint=node.role==manager \
  --mount=type=bind,src=/var/run/docker.sock,dst=/var/run/docker.sock \
  dockersamples/visualizer
And if everything went well, then navigating to http://192.168.99.100:8083 should result in the following screen: